Microsoft Outlook, the emailing application, is an important part of daily communication. It connects your important messages and keep record of your important business deals, offers, and creatives (if you are into designing).
Contents
How Do I Reply with Attachments in Outlook?
Generally, informative documents such as offers, bonds, certificates, creatives, etc – are sent to you as attachments that you must download for further reference. If you want to send one of these emails with an attachment, you must drag and drop the attachment into your new mail composing box. In the other direction, if you simply forward an email containing an attachment, the attachment seems to remain in the forwarding message. When you click the ‘Reply‘ button to the same email, however, you discover that you have lost your attachment. If you don’t want to write a new email instead of simply replying to an existing one, this can be a major problem.
After reading the solutions given below, you will not only understand how to reply email with attachments in Outlook 2016, but you will also be able to create an Outlook reply with attachment add-in.
Reply Email with Attachment in Outlook 2016
If you are tired of looking for the exact answer to how to reply all of attachments add-in for outlook 2016, we are here to help. You will no longer need to Google “outlook respond with attachment” after reading this post.
Sol. 1 Drag and Drop or Copy/Paste to Reply and Reattach
This is the most common process in which you must press the Reply and Reply to All buttons, and then simply reattach the attachment by dragging and dropping it.
If you want to speed up the process of dragging and dropping an attachment, you can drag it directly from the ‘Reading Pane‘ into the ‘Reply‘ Message box by using a special keyword ‘ALT+TAB’ to move from one window to another.
As in the second method simply copy the original attachment and paste it into the replying email that you are sending.
- Click on the email with the attachment.
- Simply right-click on the attachment and then select ‘Select All.’
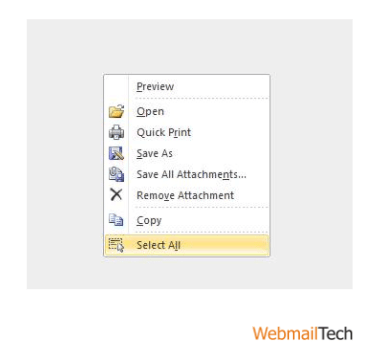
- Now that your assigned attachment or group of attachments has been selected, copy all messages by right-clicking on it.
- In the email address, click the reply button.
- When you press the Enter key in a reply message box, right-click and pick ‘Paste‘ to add your files to your replying email.
- This is how you will be ready to send an Outlook reply with an attachment add-in.
Sol. 2 Reply and Forward (Outlook reply with attachment)
Similarly to the previous process, you must readdress the messages after pressing. The forwarding button instead of reattaching the attachment (which already maintain the attachments)
To re-address the recipient, follow these steps:
- Open the email with the attachment.
- Now, copy the address where you want to send the email containing the attachment by right-clicking on an address in the ‘To’ field and then clicking ‘Select All‘ from the following option. Dropbox is a storage service that allows you to store
- Copy the address with CTRL+C and paste it into the To, CC, or Bcc section of the replying message box.
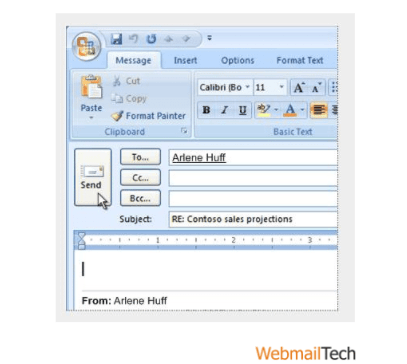
- Finally, forward the email to all newly added emails.
The method is the easiest way to forward emails with attachments to new people because it appears to them as a forwarded email thread rather than a reply message.
sol. 3 Resending Submitted Email in Outlook Reply with Attachment add-in
‘Resend, This Message’ is usually displayed when resending a sent email; however, you can use the same option for a received message by following these steps:
- To open the message, double-click on it.
- Then, select Choices, click ‘Resend this Message.’
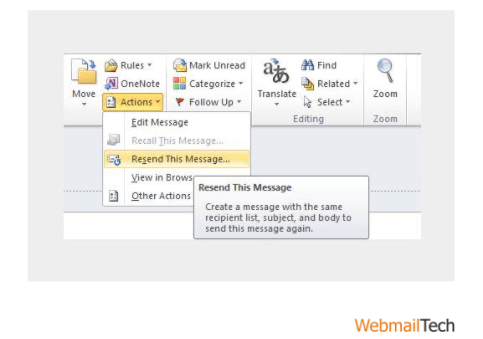
- To complete the task, simply select the correct option.
The method appears to be easy, but unlike a reply or forward message. The resent message does not receive a header.
Note: At that process, you must delete the ‘From’ address and enter it in the To, CC, or BCC address fields.
Reply with Attachments in Outlook using VBA
VBA macro will automatically help you in “How Do I Reply with Attachments in Outlook?” It should be noted that before starting the process, you must allow Macros in Microsoft Outlook. When the procedure starts select the email with an attachment to which you wish to reply.
To open the Microsoft Visual Basic opening Applications window, press Alt+F11.
When the browser window opens, In the Left bar, expand Project1 and Microsoft Outlook Object to open the ThisOutlookSession.
In this step, you must copy and paste the following code (mentioned below) into the ThisOutlookSession window.
Sub RunReplyWithAttachments()
‘Update by Extendoffice 20180830
Dim xReplyItem As Outlook.MailItem
Dim xItem As Object
On Error Resume Next
Set xItem = GetCurrentItem()
If x Item Is Nothing Then Exit Sub
Set xReplyItem = xItem.Reply
CopyAttachments xItem, xReplyItem
xReplyItem.Display
Set xReplyItem = Nothing
Set xItem = Nothing
End Sub
Sub RunReplyAllWithAttachments()
Dim xReplyAllItem As Outlook.MailItem
Dim xItem As Object
Set xItem = GetCurrentItem()
If x Item Is Nothing Then Exit Sub
Set xReplyAllItem = xItem.ReplyAll
CopyAttachments xItem, xReplyAllItem
xReplyAllItem.Display
Set xReplyAllItem = Nothing
Set xItem = Nothing
End Sub
Function GetCurrentItem() As Object
On Error Resume Next
Select Case TypeName(Application.ActiveWindow)
Case “Explorer”
Set GetCurrentItem = Application.ActiveExplorer.Selection.Item(1)
Case “Inspector”
Set GetCurrentItem = Application.ActiveInspector.currentItem
End Select
End Function
Sub CopyAttachments(SourceItem As MailItem, TargetItem As MailItem)
Dim xFilePath As String
Dim xAttachment As Attachment
Dim xFSO As Scripting.FileSystemObject
Dim xTmpFolder As Scripting.Folder
Dim xFldPath As String
Set xFSO = New Scripting.FileSystemObject
Set xTmpFolder = xFSO.GetSpecialFolder(2)
xFldPath = xTmpFolder.Path & “\”
For Each xAttachment In SourceItem.Attachments
If IsEmbeddedAttachment(xAttachment) = False Then
xFilePath = xFldPath & xAttachment.Filename
xAttachment.SaveAsFile xFilePath
TargetItem.Attachments.Add xFilePath, , , xAttachment.DisplayName
xFSO.DeleteFile xFilePath
End If
Next
Set xFSO = Nothing
Set xTmpFolder = Nothing
End Sub
Function IsEmbeddedAttachment(Attach As Attachment)
Dim xAttParent As Object
Dim xCID As String, xID As String
Dim xHTML As String
On Error Resume Next
Set xAttParent = Attach.Parent
xCID = “”
xCID = Attach.PropertyAccessor.GetProperty(“http://schemas.microsoft.com/mapi/proptag/0x3712001F”)
If xCID <> “” Then
xHTML = xAttParent.HTMLBody
xID = “cid:” & xCID
If InStr(xHTML, xID) > 0 Then
IsEmbeddedAttachment = True
Else
IsEmbeddedAttachment = False
End If
End If
End Function
After pasting the above-mentioned code, press the F5 key to execute the macro. If you want to reply to all with attachments, simply click RunReplyAllWithAttachments; otherwise, simply pick RunReplyWithAttachments and then click the Run Button. The action will bring up a Reply Window with all attachments intact.
In the final step, you can write your reply message and send it to your assigned users.
As the article ends, we hope you found the processes listed helpful in correcting your problem with an outlook reply with an attachment.
You may be encountering other issues/errors, such as How to Connect an Email to Another Email in Outlook and How to Change Your Outlook Signature. Don’t worry, you’ll find the best solution to your problems right here. The solutions are well-described, and you will be able to execute them any problem. Through Webmailtech, you get guaranteed solutions to all kinds of errors or problems under a single roof.

