
Your inbox will soon become a messy nightmare as a result of incoming and outgoing messages. Users may use Microsoft Outlook to track and organize their email by creating a rule in outlook online. Fortunately, if you know how to create rules in Outlook, your inbox will take care of itself. A rule in Outlook is a situation created by the user to manage sending and receiving mail messages from the user. Rules may be developed using a number of templates, including objects, senders, and receivers. Rules in Outlook, for example, can be used to
- Move emails from a list to another folder.
- Send all emails with multiple attachments to a different email address.
- Create a category for emails with a specific word in the subject.
This article explains how to create rules in all versions of Outlook, including Outlook 365, 2007, 2010, 2013, 2019, and others. When you make a rule in Outlook, the outlook account will look for what you want it to look for and follow all of the requirements that you defined when you made it. Use one or more methods to create a law in Outlook.
Contents
Create Rules In Outlook 2016
The procedure below is completely similar to Outlook office 2016. Also simple automation processes can be done by following the steps below and creating outlook rules.
- Click the ‘Home’ button in Outlook.
- Pull down the tab by clicking on ‘Rule.’
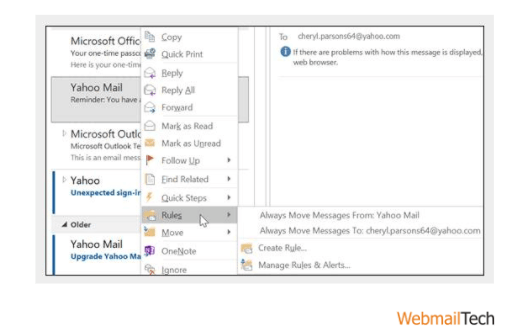
- Select ‘Manage Rules.’
- Click on ‘New Rule’ in the ‘Email Rules’ list.
- Choose a ‘Template’ based on your preferences.
- Select one or more desired conditions from the ‘Select Conditions’ section.
- Choose one or more desired actions from the ‘Select Action’ section.
- The user will create exceptions based on his preferences by selecting ‘Select Exceptions’.
- Create the name ‘rule name.’
- Click on the ‘Turn on this rule’ and ‘Finish’ buttons, respectively.
Users of Outlook Office 2016 will verify whether the rule they developed is working by moving to the ‘Email Rules’ tab and clicking on the ‘Run Rules Now’ button. The section will display all of the rules that you have activated. If you were unable to create a rule in Outlook, move to the next process.
Create Rules In Outlook 2013
The following content explains how to create a rule in Outlook 2013 with a few examples. The examples selected are two of the organization’s most famous outlook principles. Examine the examples to learn how to construct a domain rule in Outlook.
- Flag several incoming Emails
You may forget to follow-up on an important email due to a rush of work but only remember it until it is too late. To prevent this from happening again, create an Outlook rule called Flag several incoming emails by following the steps below:
Select ‘New Rule’ > To set up a rule in Outlook, go to the ‘Select condition’ section, then select ‘Flag emails from the receiver for follow-up’, then press ‘Next’, now ‘Turn on the rule,’ finally ‘Finish.’
- Keep the mails on-Top
If you get lost in your boring job and fail to review your emails for an extended period of time, all you have to do is follow the steps below to create an Outlook 2013 rule that keeps your emails at the top of the list.
Go to the ‘Stay up to Date‘ tab > click ‘New Rule’. select the kind of alert you like > Select your preferred options from the ‘Select Condition’ and ‘Select Exceptions >’ . To set up this rule, press ‘Finish.’
If you still didn’t work out how to create rules in Outlook 2013, don’t worry! To learn how to create a new rule in Outlook 2010, go to the next page.
Create a Rule in Outlook 2010 for Emails
Follow the steps one by one as written to learn How to easily create a rule in Outlook 2010 for Emails:
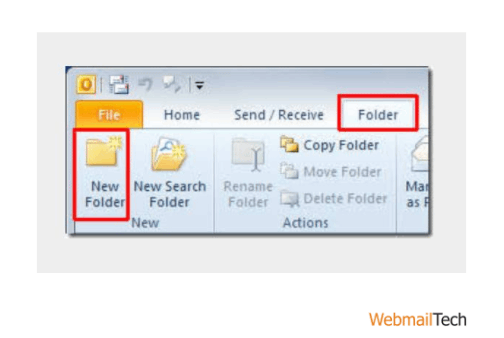
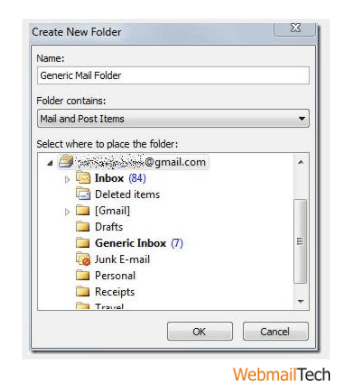
- Tap on ‘New Folder’ in your Outlook profile.
- Choose ‘Create New Folder’.
- Drop down the “Folder contains” and change the “Name of the folder.”
- Choose ‘Mail and Post Items’ from the drop-down menu.
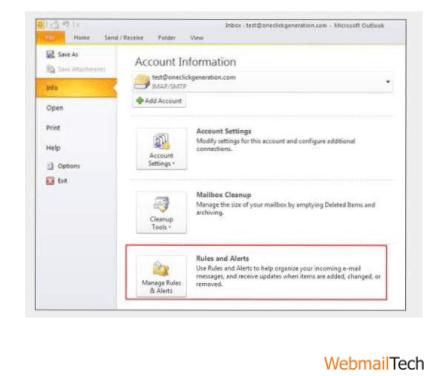
- Return to ‘Home’ by clicking on ‘Inbox.’
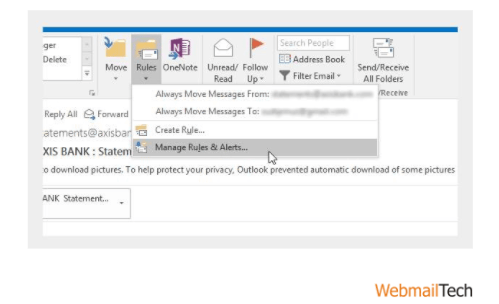
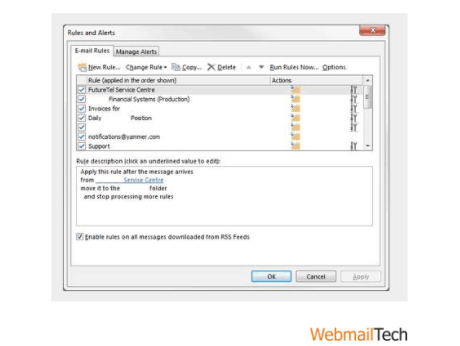
- Select the ‘Manage Rules and Alerts’ option from the ‘Rules’ page.
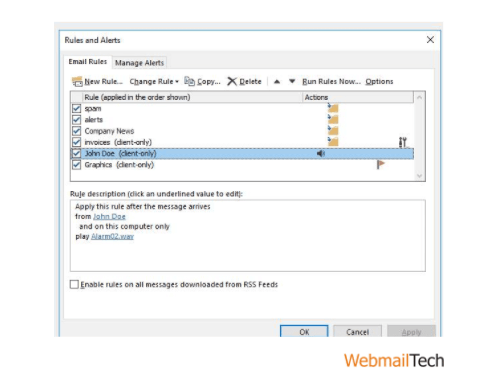
- To make a new rule, click on the ‘New Rule’ button.
- Choose ‘Move emails to a folder with specific words in the subject.’
- Tap on ‘Specific words’ and then ‘Add’ to approve it.
- Return to the ‘Rules and Alerts’ section and click on the ‘Finish’ button to see if the rules you created are active.
Users that are having difficulty using the above steps to create a rule in Outlook 2010 for emails should use the next procedure to learn how to create rules in Outlook 365.
Create Rules In Outlook 365 and other Outlook Versions
To be a productive communicator in the workplace, one must also be a successful organizer. Outlook has the best features for organizing your email address according to your preferences, ensuring that your inefficient maildrop does not interrupt your ability to work. To create rules in Outlook 365 and other versions, follow the steps below:
- Click on the ‘File’ and ‘Manage Rules and Alerts’ buttons, respectively.
- Select ‘New Rule’ from the ‘Email Rules’ menu.
- Select a Template and make changes to the rule’s “Definition.”
- Choose one from each of the following sections:
- Based on your preferences, you will use ‘Conditions,’ ‘Actions,’ and ‘Exceptions.’
- To name your folder, type a name in the box below.
- ‘Turn on the rule’ and ‘Finish’ are the buttons to press.
The rule has been made, and you can create even more by using some of the methods described in the post. You may be experiencing additional problems/errors, such as Microsoft office sorry we are having temporary server issues. Outlook plain text to HTML conversion Outlook users who are still unable to create a rule in their Outlook profile will require help by connecting with our highly experienced technicians via chat. Our Webmailtech skilled and experienced tech staff offers resources for all types of tech-related problems, most importantly Don’t be afraid to start up a discussion with us.