One of the most common question by Outlook users is, Can I do a mail merge in Outlook? Despite to be a little tricky, a mail merge Outlook process can be handled easily with the help of self-help guides like we’re seeing right here.
Contents
So, what exactly does Mail Merge in Outlook mean?
A mail merge in Outlook is the process of sending a personalized message to multiple contacts at the same time using the Outlook email app. This is a smart way to send emails or seasonal greetings because it seems more personal and helps create relationship with clients and consumers.
Set Up Mail Merge in Outlook
In Outlook 365, you can do mail merge in a number of different ways. Tools such as the ‘easy mail merge Outlook add-in’ and plug-ins help in the process’s simplicity. This guide will teach you what you need to know about merging emails in Outlook and other basics. Let’s take a look at them all right here:
How To Mail Merge in Outlook 365
If all of the contacts are already in your Outlook contact folder, starting a mail merge using Outlook 365 is the simplest process. In this article, we will first show you how to send an email to the contacts you have selected. Let’s get started:
- Choose the contacts from your Outlook’s ‘contact list.’ (To easily open your contact folder, press CTRL + 3.)
- Click to pick the contact to whom you want to submit your draught. You can also use a filter to create a personalized view.
- Pick Mail Merge from the drop-down menu after clicking Tools.
- Select one of the following options to verify:
- ‘’All Contacts in Current View” helps in filtering the contacts that you want to address.
- When you manually pick contacts from the contacts folder, the option ‘’Only Selected Contacts” is required.
- Under the ‘Merge Option section’ at the bottom of the text box, choose the following:
- Form Letters are a type of document.
- Merge: with Email Address
- Message Subject Line: download the subject line here for all messages> (You should change it to match your requirements)
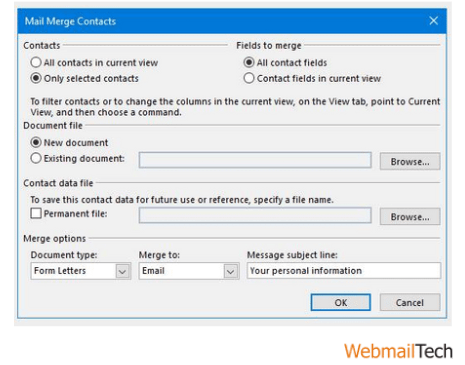
- Click OK and wait for the email drafted box to open.
- Move to the Mailing page.
- Create an email by selecting one of the following options:
- To insert greetings/pleasantries in your inbox, click the ‘Greeting Line’ button.
(Please keep in mind that you are free to type in the field box.) So, instead of “Dear,” you might type “Hi or Good Morning“)
- When you’re happy with your greeting line, press OK.
- As an example, we must verify the contact’s email addresses. To do so, enter the following:
(Please double-check the contact information that we have on file and either confirm it or provide us with new information.)
- To start a new line, press ENTER again.
- Then insert the email by clicking the “Address Block” button.
- Click OK to close the dialogue box and Enter to begin a new section.
- By clicking on the “Insert Merge Field” tab, we can also insert the phone number or some other information.
- Select ‘Home Phone’ or ‘Mobile’ and then press the Insert button.
- To start the new line, press Enter after clicking the Close button.
- You can end your message by typing ‘Thank you in advance or Best Regards Your name>.
- You will also preview the results to guarantee that everyone’s name appears correctly. It’s now time to click the “Preview Results” tab, which can be found in the “Preview Results” group. To move through the recipient list, use the forward and back arrows next to it.
- Press the ‘Finish & Merge’ tab, then the ‘Send email messages’ button.
Create A Mail Merge From Microsoft Word To Outlook
It is simple to mail merge in Outlook using Microsoft Word.
Please keep in mind that Microsoft Word is compliant with mail merge while using Outlook 2007 or later.
The measures for creating an email merge in Microsoft Word are as follows.
- Start Microsoft Word 2010. Create an email in a Word document.
- Navigate to the Mailing page.
- Select the “Start Mail Merge” option. It will show a list of available mail merge options. Letters, Email Messages, Envelopes, Labels, and Directory are all options.
- Click the ‘Pick Recipients’ button to help you choose the recipients of your email merge.
- Select ‘Select from Outlook Contacts.’ It will automatically import your contacts from Outlook 2010.
- To insert greetings/pleasantries in your inbox, click the ‘Greeting Line’ button. When you’re happy with your greeting line, press OK.
- Click on “Write & Insert Fields” to find the appropriate fields to add any detailed information. To start, click the OK button.
- You will also preview the results to ensure that everyone’s name appears correctly. In the “Preview Results” group, click the “Preview Results” button once more.
- Click the ‘Finish & Merge’ button, then the ‘Send email messages’ button.
- You will request that a topic be added to your copy. When you’re done, press OK to send the message.
- Microsoft Word transfers the freshly written email to the outbox in Outlook.
- Users can access their Outlook mail merge with attachment in the sent items folder.
Outlook Mail Merge in Microsoft Excel
You can use Outlook’s mail merge function in combination with Excel and Word to send an email to a large number of recipients. It helps in the customization of messages for each recipient.
Users store all of the recipient’s details on an Excel sheet. The purpose of creating a spreadsheet is to perform an Outlook mail merge with attachments.
Make a spreadsheet with column headings such As first Name, Last Name, and Email Address. After that, proceed with the steps below to start mail merge in Outlook:
- Start with a blank document in Microsoft Word.
- Move to the Mailing Tab.
- From here, select the Start Mail Merge option.
- Choose E-Mail Messages from the drop-down menu.
- From the Select Recipients menu, select the Use Existing List option.
(Please keep in mind that we are doing a mail merge from Excel to Outlook. We only use an attachment in the form of an excel file. As a result, is similar to what we achieved in Outlook.)
- Move to and pick the Excel file you created, then press the Open button.
- Click on the cell in the Select Table window that contains the recipient’s information. It will help you in customizing the contents of your excel spreadsheet.
- Place the cursor where you want the data to be inserted and then press the OK button.
- Now, in the Word document, write an email.
- To insert greetings/pleasantries in your inbox, click the ‘Greeting Line’ button. press OK.
- Click on “Write & Insert Fields” to locate the appropriate fields to add some additional details. To start, click the OK button.
- You’ll see a category called “Preview Results.” Click the “Preview Results” tab to the right.
- Then, click the ‘Finish & Merge‘ button, followed by the ‘Send E-mail Messages’ button.
Pick the entire field from the ‘To’ drop-down menu. - You would ask to add a subject to your document.
- Pick the HTML option from the Mail-Format drop-down menu.
- Next to the Send records radio button, click the All button.
- Press OK to send the message.
In conclusion
If you are having difficulty managing a mail merge in Outlook, you can contact our customer support team at any time. Continue reading for detailed instructions about how to add a read receipt in Outlook and other topics.