 If you’re wondering how to Configure Email on iPhone, the response is that you can set up your own email account on the iPhone automatically by following a few simple guidelines below.
How do I set up my Apple iPhone 12 Pro Max’s mail?
With the iOS 14 operating system, all Apple computers come pre-installed with an email programmed that helps you to read and transmit email messages.
Kindly, check details before beginning the email setup on your iPhone 12 Pro Max:
- (example@gmail.com) email address
- Need Password.
- If it’s not a Hotmail, iCloud, Microsoft Exchange, Gmail, Yahoo, Aol, Office 365, or Outlook account, you’ll need to find out whether it’s a POP or IMAP account, as well as the incoming and outgoing servers.
The iOS 14 operating system is compatible with the iPhone 12 Pro Max.
10 minutes is the approximate time.
Step: 1
To set up an email address on your iPhone 12 Pro Max, go to the Apple iPhone 12 Pro Max settings, which is the gear icon on your Apple computer.

Step: 2
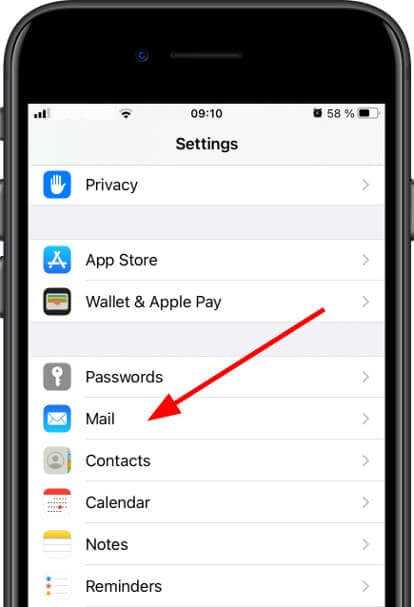
We’re going through the iPhone 12 Pro Max settings and looking for the section called “Mail” that was formerly known as “Passwords and Accounts” in previous versions of the iOS 14 operating system. Only click the button to take access.

Step: 3
We’re looking for the “Accounts” section. then clicking on it to open all the accounts installed on our Iphone 12 Pro Max. Many of the email addresses that have been installed on our iPhone 12 Pro Max, both active and inactive, will be shown. If this is the first email address you’ve installed on your Apple iPhone 12 Pro Max, you’ll see an empty folder. Choose “Add Email Address” from the drop-down menu.

Step:4
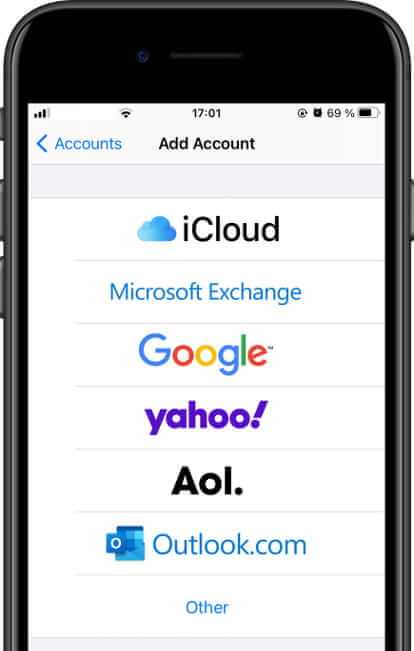
iCloud, Exchange, Google, Yahoo, Aol, and Outlook.com are just a few of the common accounts that can be set up quickly on the iPhone 12 Pro Max. If you have an email address for one of these mail services, click the icon; the device will connect to the service and ask for your email account or username and password; your email account will be installed on your Apple iPhone 12 Pro Max after a few minutes. Choose “Other” if your email address is not associated with any of the services mentioned. The first choice that appears is “Add email address,” which is the one we want to use to set up our Apple’s email. To continue, select this option.

Step: 5
Enter your username (as you want it to appear in the messages you send), your email address, the password for this email address, and a rundown to help the Apple iPhone 12 Pro Max remember it. “Next” is the next move.]
IMAP Or POP Setting in Apple iphone 12 Max pro.
Choose if you want to set up an IMAP or POP account on your Apple iPhone 12 Pro Max.
What makes a POP or POP3 account different from an IMAP account?
When you set up an IMAP account on your iPhone 12 Pro Max, a snapshot of your emails will be saved on the cloud or on the mail server.
If you delete or upload an email from your Apple iPhone 12 Pro Max folder, the upgrade will be repeated on the server and, as a result, on all devices with the same email address.
If you have a POP or POP3 account with your Apple, emails are downloaded to the system and can be deleted, read or changed without affecting other people who have the same email account.
Typically, this configuration is used for shared accounts where certain people want to label emails that others have read as NOT read, or for those who have emails on their phone and computer and do not want notifications to be repeated on the other system.
How To Setup Email On iphone 8 ?
Learn how to Configure email account on iphone 8 by following the manual below.
Here’s how to use IMAP to bind to your Hotmail account from your Mac OS X Mail programme.
- Switch on your apple iPhone 8.
- Go to Preferences, then Accounts & Passwords, then Add Account.
- In the Desired alternative section, select your Email address form.
- Tap the Save button after entering the necessary credentials in the provided area.
Tap the Save button after entering the appropriate credentials in the provided area.
To learn how to Setup Email On Android in a Simplified Way, go here.
How To Setup Email On iphone 6 ?
The step-by-step directions below will show you how to Configure email account on iphone 6.
- Choose Mail, Contact, CalendarsAdd AccountOtherAdd Mail Account from the Settings menu.
- Fill in the blanks with the necessary information.
- Choose IMAP or POP from the drop down menu.
- In the Hostname field of the Incoming & Outgoing mail server, form mail.worldsecureemail.com.
- Type setup@bc-mail.tk in the text field of the user name in the same manner.
- Enable the authentication process to be done for a few minutes.
- Choose the “Save” option.
How To Configure email account on iphone 7 ?
Follow these guide line. and see How to Configure email account on iphone 7
You can download emails to your cell, device, or tablet using IMAP. IMAP allows you to connect your email with the server. As a result, any changes in your inbox will be reflected in all of your devices.
- Tap the Settings icon.
- Flip down the screen, look for the Accounts & Password option, and select it.
- Now you can see a list of options displayed on the screen.
- Press on the add account option
- All email providers icon will be displayed on the screen.
- Choose the Other option from the menu list.
- Tap the Add Mail Account option.
- Follow the on-screen instructions to finish the Email setup process.
- Once you set up your email account, touch the Save button.
How To Configure Email On iphone X ?
We’ll show you how to Configure email account on iPhone X in an easy way.
- Navigate to the Settings section of your iPhone device.
- Tap Mail, Contacts, Calendars, Add Account, Microsoft Exchange.
- You will be prompted to type your exchange account settings in the given field.
- After entering the required information, touch the Next button.
- Choose the sync option from the list and tap the Save button.
