Secureserver.Net Email Settings
Secureserver.Net email allows users to configure their Secureserver.Net email account on any device or email account. You must know the necessary Secureserver.Net Settings for this reason since the email account cannot be setup without the proper server settings. Don’t worry, we’ve detailed the Secureserver.Net Settings for various devices and email clients that you’ll need to use below. You will also find the Secureserver.IMAP, Net’s POP, and SMTP server settings here. After reading this article, you will understand how to configure your Secureserver.Net email account as per the right server settings.
There are several additional articles on the Secureserver. Net email settings just skirt the issue, leaving you with no clear image of what settings to use for your email account configuration. We’re not going to do it. Let’s start with the Secureserver.Net server settings.
Secureserver.Net IMAP Configuration (Incoming Mail Server)
The IMAP server settings are necessary for the activation of incoming email services. We have included the correct Secureserver.Net IMAP settings that you must enter and apply during the Secureserver.Net email account configuration procedure.
| Incoming Email Server account type | IMAP |
|---|---|
| Incoming Email Server user name | email address |
| Incoming Email Server password | email password |
| Incoming Email Server hostname | imap.secureserver.net |
| Incoming Email Server Port | 993 |
| Incoming Email Server TLS/SSL required | YES |
| Authentication required | YES (Email account Username and Password) |
Your Secureserver.Net email account will be set up as a POP account as soon as you apply the aforementioned POP server settings, and your mail inbox will begin to show incoming emails.
Secureserver.Net SMTP Configuration (Outgoing Mail Server)
To enable the outgoing mail services, you must also enter and apply the Secureserver.Net SMTP Settings listed in the table below. No emails may be sent unless the SMTP server settings are right.
| Outgoing Email Server account type | SMTP |
|---|---|
| Outgoing Email Server user name | email address |
| Outgoing Email Server password | email password |
| Outgoing Email Server hostname | smtpout.secureserver.net |
| Outgoing Email Server Port | 465 |
| Outgoing Email Server TLS/SSL required | YES |
| Authentication required | YES (Email account Username and Password) |
The previously described Secureserver. Net SMTP settings will assist you in activating outgoing mail services on your Secureserver. Net email address. Send an email to someone and check to see if it was sent successfully.
Secureserver.Net Android Configuration
Many of you may be able to set up your Secureserver.
You may use your Android devices to access your Net email account. No worries, we’ve got the right Secureserver. Net settings for Android are described here, along with the other procedures required to establish your Secureserver. Net email account on Android smartphones.
- To start, go to your Android device’s app drawer and choose the Mail icon.
- You must now enter all of the needed information, such as your complete email address and password, into the appropriate fields.
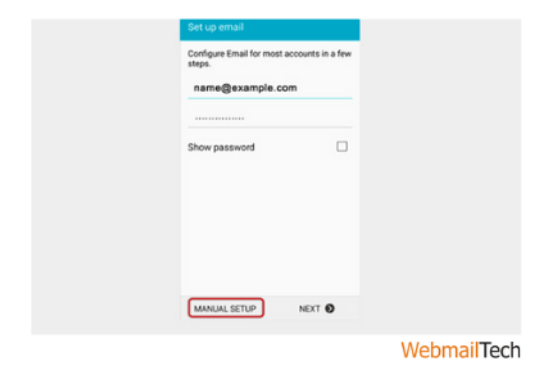
- Select the “Manual Setup” option.
- You may use either an IMAP or POP server for your incoming mail server, based on your preferences.
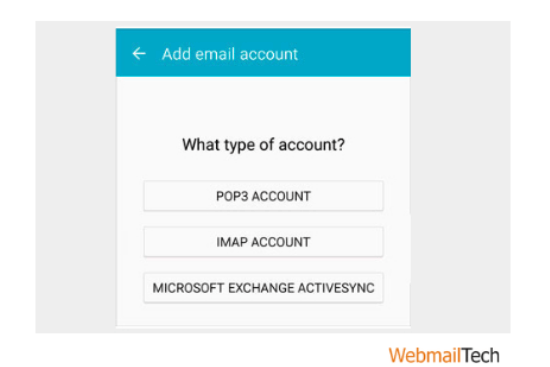
- If you’ve chosen IMAP as your incoming mail server, you’ll need to enter and apply the IMAP server settings shown below.
| IMAP Server | “imap.secureserver.net” |
|---|---|
| Security type | None |
| IMAP server port | 993 |
| Secure port | 993 |
| Security type | SSL/TLS (Accept all certificates) |
| Insecure port | 143 |
| Security type | None (Accept all certificates) |
Users can always use the POP server instead of the IMAP server by entering the POP server settings as shown below:-
| POP server | “pop.secureserver.net” |
|---|---|
| Security type | None |
| POP server port | 995 |
| Secure port | 993 |
| Security type | SSL/TLS (Accept all certificates) |
| Insecure port | 110 |
| Security type | None (Accept all certificates) |
- After you have finished entering the server settings as described above for your chosen IMAP or POP server, click the “Next” button.
- You must also enter and apply the outgoing SMTP server settings shown below before clicking the “Next” button.
- In place of the SMTP server, enter “smtpout.secureserver.net”.
- You must select None as the security type.
- The SMTP server port must be set to 465. The standard SMTP server settings are listed below.
| Outgoing (SMTP) secure port | 465 |
|---|---|
| Security type | SSL/TLS (Accept all certificates) |
| Outgoing secure (SMTP roaming server) port | 587 |
| Security type | SSL/TLS (Accept all certificates) |
| Outgoing (SMTP) port | 25 |
| Security type | None (Accept all certificates) |
| Outgoing insecure (SMTP roaming server) port | 587 |
| Security type | None (Accept all certificates) |
- Finally, you must click the “Done” button to finish the account setting procedure.
All of the above processes and procedures will assist you in properly configuring your Secureserver.Net email account on any Android device. You may now send and receive emails from your Android device without any problems.
Secureserver.Net Email Configuration for iPhone
Some users have difficulties configuring their Secureserver.
Net email account on their iPhone device since they are unsure of the server settings to be used. No need to worry, the right Secureserver is shown below. Net email settings for iPhone are described step by step so that you may set up your Secureserver. Any iPhone can successfully access a Net email account.
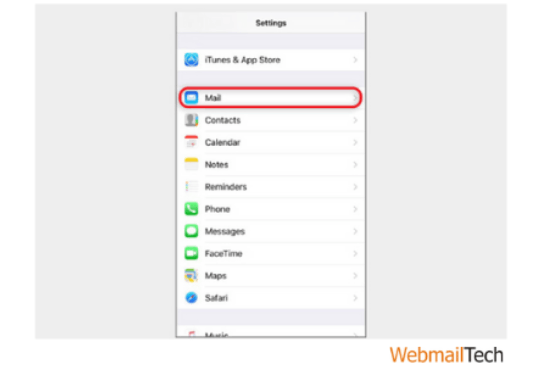
- To start, go to your iPhone’s settings.
- Now, select the “Mail” option.
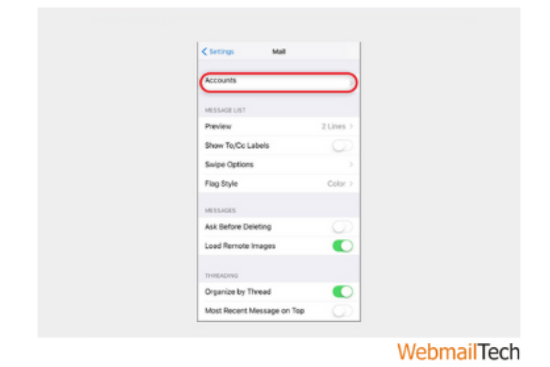
- Click “Accounts”.
- Choose the “Add Account” option.
- Now, from the available menu, select “Other.”
- Select the “Add Mail Account” option.
- In lieu of Username, enter your full email address. Both the receiving and outgoing mail servers will use the same login and password.
- In the incoming mail server hostname field, type “pop.secureserver.net.”
- Put “smtpout.secureserver.net” in place of the outgoing mail server hostname.
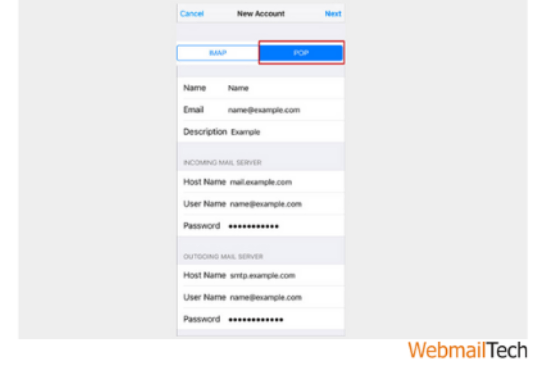
You may always use the IMAP server instead of the POP server the setting all server settings listed below:
- Make sure to input your full Secureserver.Net email address in place of the username.
- The username and password will be the same for both the outgoing and incoming mail servers.
- In the incoming mail server hostname field, type “imap.secureserver.net.”
- In the place of the outgoing mail server, type “smtpout.secureserver.net”.
- You will now get a prompt notice asking you to verify the incoming and outgoing server data. You may either click on the “Continue” button for both the incoming and outgoing servers, or click on “Details” and then click on “Trust.”
- To apply the previously specified server settings, click the “Save” button.
- Make a decision for the account that you just created.
- Select the “SMTP Server” option.
- Make sure to input the SMTP server settings as shown below, and then click the “Done” button.
| Outgoing (SMTP) secure port | 465 |
|---|---|
| Security type | SSL/TLS (Accept all certificates) |
| Outgoing secure (SMTP roaming server) port | 587 |
| Security type | SSL/TLS (Accept all certificates) |
| Outgoing (SMTP) port | 25 |
| Security type | None (Accept all certificates) |
| Outgoing insecure (SMTP roaming server) port | 587 |
| Security type | None (Accept all certificates) |
- Select the “Password” option for Authentication.
Excellent! The proper Secureserver.Net email settings for iPhone have been adjusted, and you are now ready to utilise the Secureserver. Without any difficulty, you can access Internet email services on your iPhone device.
Secureserver.Net Email Configuration for Outlook 2007
The steps below describe the Secureserver.Net email settings for Outlook 2007. You may establish your Secureserver.Net email account on Outlook 2007 in a couple of minutes by following the steps shown below in sequence.
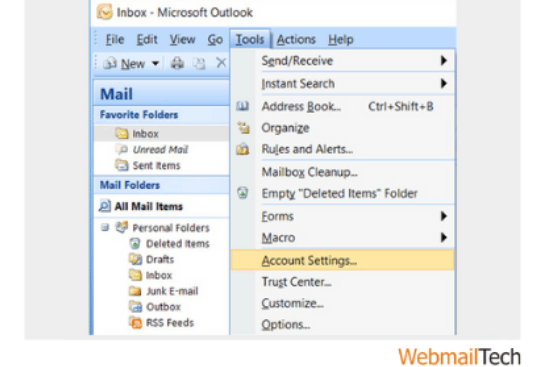
- To start, open the Outlook 2007 apps on your device
- Now, from the menu bar, select the “Tools” option.
- Click the “Accounts Settings” option.
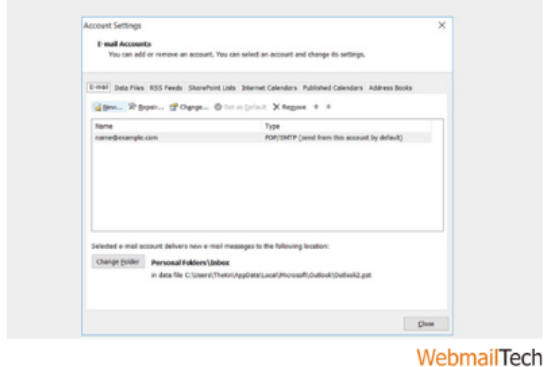
- Find and choose the email tab from the Account Settings page, then select the “New” option.
- Select “Microsoft Exchange, POP3, IMAP, or HTTP” and then click the “Next” button.
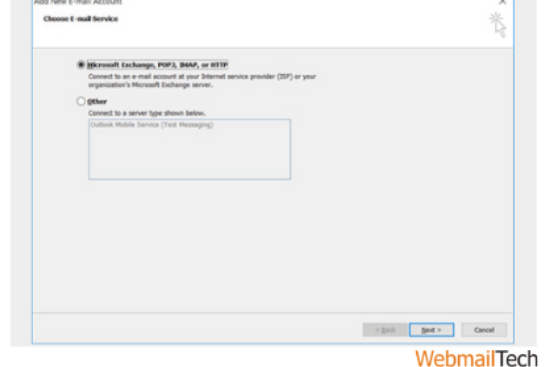
- Choose the checkbox for “Manually specified server settings or extra server types” and then click the “Next” button.
- Select “Internet email” and then click on the “Next” button.
- Fill in all of the required details/information in their respective field boxes based on your IMAP or POP server choices, and then just click on the option of “More Settings.”
- Move towards the outgoing server tab and verify that the checkboxes that read as “My outgoing server (SMTP) requires authentication” and “Use same settings as my incoming mail server” are selected.
| Incoming port | 110 |
|---|---|
| Outgoing port | 465 |
| Secure port | 995 |
| Security type | SSL/TLS (Accept all certificates) |
| Insecure port | 110 |
| Security type | None (Accept all certificates) |
| This server requires an encrypted connection (SSL) | Not tick |
| Encrypted connection (SSL) | None |
Secureserver.Net IMAP configuration
| Incoming port | 143 |
|---|---|
| Outgoing port | 465 |
| Secure port | 993 |
| Security type | SSL/TLS (Accept all certificates) |
| Insecure port | 143 |
| Security type | None (Accept all certificates) |
| This server requires an encrypted connection (SSL) | Not tick |
| Encrypted connection (SSL) | None |
- If you want to enable the secure SSL/TLS settings, click the “This service requires a secure connection (SSL)” checkbox for both incoming and outgoing email.
Secureserver.Net SMTP configuration
| Outgoing (SMTP) secure port | 465 |
|---|---|
| Security type | SSL/TLS (Accept all certificates) |
| Outgoing secure (SMTP roaming server) port | 587 |
| Security type | SSL/TLS (Accept all certificates) |
| Outgoing (SMTP) port | 25 |
| Security type | None (Accept all certificates) |
| Outgoing insecure (SMTP roaming server) port | 587 |
| Security type | None (Accept all certificates) |
- To save and apply the previously stated server settings, click the “OK” button.
- Finally, just click the “Next” button and then the “Finish” button to finish the account setting procedure.
Thank you very much! You have completed the installation of your Secureserver. Net email account in Outlook 2007 with the appropriate Secureserver.Net email Outlook 2007 settings
Secureserver.Net Email Configuration for Outlook 2010
Do you want to set up your Secureserver.Net email account with Outlook 2010? Then simply follow the steps below, which also include the needed Secureserver.Net email settings for Outlook 2010, and you’ll have your Secureserver.net email account established in the blink of an eye. All of the stages are quite simple to follow and perform; you won’t need to put in a lot of time or effort.
- To start, open the Outlook 2010 app.
- Now, from the accessible menu bar, select “Tools” and then “Accounts Settings.”
- Go to the “Accounts Settings” page, then to the email area, and on to the “New” option.
- Now, click to the “Advanced tab” area and make sure that the Secureserver.Net settings are as follows, depending whether you’d like to use a POP or IMAP server:
Secureserver.Net POP Settings
| Incoming port | 110 |
|---|---|
| Outgoing port | 465 |
| Secure port | 995 |
| Security type | SSL/TLS (Accept all certificates) |
| Insecure port | 110 |
| Security type | None (Accept all certificates) |
| This server requires an encrypted connection (SSL) | Not tick |
| Use the following type of encrypted connection (SSL) | None |
Secureserver.Net IMAP configuration
| Incoming port | 143 |
|---|---|
| Outgoing port | 465 |
| Secure port | 993 |
| Security type | SSL/TLS (Accept all certificates) |
| Insecure port | 143 |
| Security type | None (Accept all certificates) |
| This server requires an encrypted connection (SSL) | Not tick |
| Use the following type of encrypted connection (SSL) | None |
- If you pick SSL/TLS settings, you must also select the box that says “This service requires a secure connection (SSL)” for both incoming and outgoing emails.
Secureserver.Net SMTP configuration
| Outgoing (SMTP) secure port | 465 |
|---|---|
| Security type | SSL/TLS (Accept all certificates) |
| Outgoing secure (SMTP roaming server) port | 587 |
| Security type | SSL/TLS (Accept all certificates) |
| Outgoing (SMTP) port | 25 |
| Security type | None (Accept all certificates) |
| Outgoing insecure (SMTP roaming server) port | 587 |
| Security type | None (Accept all certificates) |
- To save and apply the server settings, click the “OK” button.
- Click “Next”.
- “Finish” to finish the account setup procedure.
This is how you configure your Secureserver.Net email account in Outlook 2010 using simple and easy procedures with no guidance or help.
In this post, we reviewed all of the Secureserver.Net settings that are necessary for various devices and email clients. The server settings provided above will assist you in successfully configuring your Secureserver.Net email account. However, if you are still having trouble setting up your Secureserver.net email account, please send note outlining your issue and we will get back to you as soon as possible. Our technical staff is 24/7 to assist you with any email-related problems or issues.
Follow more information, CLICK HERE